Showing posts with label Weddings. Show all posts

Monday, April 15, 2013

Ugly Cake....It All Started With a Pan

The day started like any other day: get up, shower, make list of tasks for the day, eat breakfast, blah, blah, blah! So far, so good! After the curling iron fiasco (the spring sprung), the day started falling apart! Oh, don't get me wrong, it was a lovely day, everywhere but in the kitchen! I do need to digress to the night before when I baked the cake. Oh, it was a lovely cake with lots of promise.

 It started with a pan.....
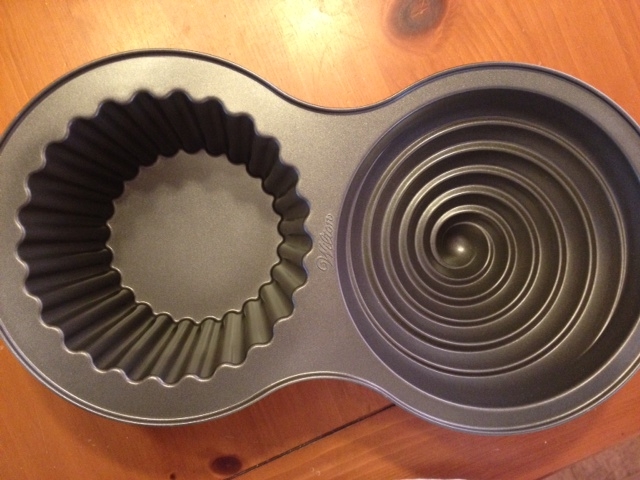

I used a "White Wedding Cake" cake recipe, this is the one that was chosen for the wedding...from what I hear, it was yummy! 


The cake looks great so far...had to do a little trimming to make the bottom flat enough to accept the top! 


Okay, so Madonna might have wanted to "wear" the top piece (she'd need two)....

And now....we are back to the morning where everything went wrong in the kitchen! 
I started making the frosting, the one chosen for the wedding. The Groom wants the grocery store butter cream frosting. So, I pull out the powdered sugar (this should have been the first sign that the cake was going to be the life of me), I cannot work with powdered sugar without making a huge mess (I had guests coming over, didn't have time for a mess)....I usually wear it, it always lands on the floor, all over the counter, in my hair, on my face...this day was no different! 


The recipe called for sifted powdered sugar...I always start out by sifting too much so I can use my big bowl to catch the mess. I don't know why I think the bowl will catch it, it never does. 

After cleaning up the kitchen mess, I mixed the frosting....and mixed.....and mixed! 


This looked disgusting, I didn't think it would ever turn into frosting....hmmmm, another sign that all was not going well with this cake! But, ever the optimist.....I kept mixing and mixing and mixing! 


And this yummy concoction is what I ended up with! I should tell you....I always tell myself to go with my gut but I never do! I don't know why, my gut is always right but yet, I always, always do opposite of what my gut says! My gut said: stay with white frosting! 

I took half of the frosting and added black gel food coloring, hoping to get black to imitate the papers from the cupcakes. Well, the frosting just turned a yucky gray. I kept adding more and more and more black gel....I used the whole darned bottle and still it was not black. So, I decided to add purple gel. I was getting excited until I saw.....

PURPLE hands, PURPLE frosting all over the counter, PURPLE on the cabinets, on the floor, on the wall....how the heck did everything turn purple and why the heck was there frosting everywhere. Now, my friend (see older "Cleaning as I Go" post) would tell you that she is surprised I wasn't running around the kitchen wiping down every surface as I was trying to dye the frosting. What she doesn't know is that was exactly what I was doing and I was making it worse. Omigosh, everything was purple! I was afraid to actually go look in the mirror, I was sure my face was a mess...and we had friends AND the Bride and Groom coming over...well, they would just see how much I love them...I am sacrificing my vanity for their cake. Did I mention that it eventually becomes the Ugly Cake? 

Anyhow, I decided to bite the bullet and use the black/purple/charcoal frosting to frost the "paper" base of the cupcake cake. I made the mistake of using the big frosting tip, over filling the frosting tube...oh no, more frosting all over the floor, the walls, the counter, the cabinets....me! I must have washed my PURPLE hands at least 10 times. I was sticky and purple! Oh man, the cupcake was looking UGLY! There was nothing I could do to make it look better so at this point I had two choices: 1) toss the whole darned thing in the trash, sit down and cry or 2) make it the UGLIEST cake I could. Obviously, I chose 2! 

I would have taken photos but hey, my hands were sticky and purple! 

So, I pressed on! I squished frosting using various tips and white frosting over the top of the cake....you know Madonna's bra cup! Well, it really looked UGLY! But hey, I wasn't done! So, I sprayed the cupcake with Violet Purple - Wilton's spray. I added ugly sugar paste roses and sprayed some more. It still wasn't UGLY enough! I had to make it UGLIER! So, I added white and black pearl candies, sprinkled some purple, crystal flakes...more frosting, more flakes and well, I finally ran out of frosting! 

Do you want to see the final UGLY product? I wish I could forget it but I promised a couple friends I was going to post my experience...

And here it is.....ta da......the UGLY cake! 


I wish the photo could have been better but then....my hands were sticky and purple! 


Well, I guess the cake was okay....it was eaten and the "White Wedding Cake" cake recipe was chosen for the Wedding....

Oh, they were all sweet and telling me that the cake was pretty, adorable, cute....no one wanted to tell me it was UGLY! Even though we all knew it! I knew it! But hey, it may have been UGLY and I may have had sticky, purple hands but when I finally gave up trying to make it pretty....I had a ball! 

It's Monday and guess what I found on the cabinets.....

Sunday, April 7, 2013

More Wedding Purple

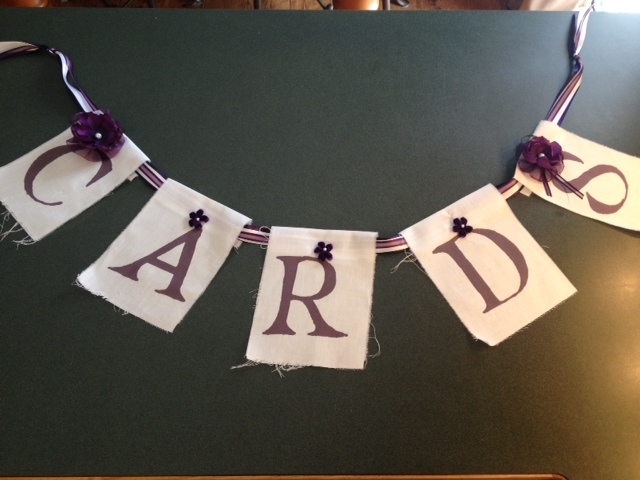
So, to go along with the card box...I decided to make a wall banner to match. I decided that maybe we needed to "explain the box"! I challenged myself to using supplies that I already had! I pulled some printable fabric, used the ribbon that I used on the box and garters, made a couple more flowers.....and my printer! Oh my, side bar here....I love my printer!

Anyhow, I didn't get a very good pic of the banner as I don't have any bare wall to hang it on....you get the idea though!


Close up of the lettering and flower, I covered the attachments with the flowers....


Baby flowers used on the three center letters...


I tied the ends of the ribbon (3 for layering) and attached the letters to it...

I like how the banner turned out! Was going to make a "Mr. & Mrs." but I don't have enough printable fabric. Will ask the Bride if she wants me to do so....we'll see....


Saturday, April 6, 2013

Wedding Purple

So, I was able to finish the garters and card box this week....for my son and his future bride! My wonderful Mom-in-Law sewed the two garters (one to keep and one to throw) for the bride....I can't sew a straight line, let alone try to gather both lace and ribbon! I called upon my Mom-in-Law to help me by sewing the garters...she did such a beautiful job! Thank you Mom! I searched all over for the perfect dark purple flowers to attach to the garters, they were not to be found! So, I went to JoAnn's to buy flowers that I could take apart and make my own. I got them home, took them apart and they were SO wrong, they had huge gaps between the petals, would not layer correctly! Took me 15 minutes to put one flower back together so I could return the darned things. So, I went to Michael's, they usually have a great selection of flowers. I found one stem of 3 flowers that were perfect! I stood right there and took a flower apart to see if it would work....it would, perfectly! HOWEVER, I could only find one stem. I was pretty depressed so I walked around the store looking for something else that would work! Guess what I found....I found 3 more stems that someone had put back by the frames....now, was that fate or what? I was so excited....grabbed a roll of matching chiffon style ribbon and raced home to make the flowers! Uh oh....I had not clue how to....I just assumed I could take them apart and layer them and they would look gorgeous! Uh, no! they just looked like flat, boring flowers. SO, I got the idea to burn the edges...I love to burn stuff! I burn paper, transparencies, ribbon, fabric....all in the name of art! This was no different....right?! So, I pulled out a tea light, lit it and proceeded in burning the edges of the petals. After decimating one (it went up in flames), I learned to manage the burn! The flower petals curled up at the edges and looked perfect! I layered the flowers, gathered the chiffon ribbon into a circle and layered them....add a velvet flower and pearls for the centers and I was a happy girl!


This flower looks a bit fuchsia in the pic but it's really the same dark purple as the ribbon! 


The center of the flower on each garter is a bit different! I wonder which one the bride will choose to keep! Hope she likes them! 

So, I had such a great time with the flowers for the garters that I put together some extras! What shall I use them on? 

Well, I was asked to make a card box....I couldn't wait to start! I searched all over this town for a box that would work (something that wasn't big enough to hold a body), impossible! I tried to order something but the shipping was ridiculous! I mentioned to my Mom-in-Law that I needed a box and again she came through for me! She had just the perfect size box but it needed to be repainted. So, I went to work....it took about 12 coats of dark purple paint to cover the Modge Podged decor.....finally, it was ready to do the crackle technique the bride had liked! The box didn't have feet so I added little, round, wooden doll heads (they have a flat bottom so I could attach them to the box) to the bottom and painted them purple too! Add the crackle medium, let dry, paint the box white and wait for the cool crackle to start! Wow, it was looking great but needed some decor! So, I pulled out the box of purple and white ribbons I picked up for the garters and other fun stuffs.....added them in layers to the box....attached two of the cool flowers I made and wow.....the box looks awesome!

You can't see the feet, they are hiding in the background but here is the front of the card box! 


Again, the flowers appear lighter than they really are due to the lighting but you get the picture! 
I hope the bride likes the box.....I can't wait for her to come over next weekend to pick them up! 
Shhhhh, don't tell her where to look for the pics, she may want them to be a surprise! 

Just a reminder....I painted Tom's shoes for the wedding as well.....everything is purple, white and black. If you didn't see the shoes....here's a couple pics: 


It's all coming together! I am having so much fun....what else can I make? 


Sunday, February 24, 2013

I had THE most fun....

For the Bride to Be....I created custom "Tom" shoes for her to wear beneath her wedding dress. I have to admit, I was TERRIFIED to begin! I just had the feeling I would screw up, if I did, I would have to order another pair of Tom's to try again....that could get spendy! So....I worked very slowly, read the words aloud (I printed their song on her shoes) as I wrote them, crossed them off the lyrics sheet as I wrote them....it took me a lot more time to work on them than other projects....just because I was TERRIFIED I would screw up. I didn't! 

I did it, I decorated both shoes, without any crossing out of words, without any smears of paint, without an "redo's"! LOL I showed them to my friends at work, my In-Law's and our best friends...everyone loved them....makes the heart feel good! I have to admit....I would love to make some for me....not wedding themed, of course! Wanna take a look....I'm willing to show them off....would love your feedback! 


The big letters and numbers are done in dark purple with black trim, the song in black and each flower is purple with colored rhinestones for the centers! Oh my, I had such a great time with them! I'm not sure if they are what the Bride wants, or if she likes them...but that's okay! If she doesn't....at least I had the experience of doing something I had not done before. AND.....I know that I want to make some for myself! 

Saturday, February 23, 2013

Practicing Once Again.....

So, I am once again practicing for the wedding.....good thing I have several months to practice as I'm still mastering my technique....not there yet! I can accept that....I will keep practicing until I am where I want to be. I just had an epiphany....I don't have to make cupcakes to practice frosting....I can frost paper! Good thing cause last night I goofed! I was preparing the buttercream frosting for the cupcakes only to realize that I pulled the WRONG recipe...I was making Royal Frosting which dries hard! OMG! So, now I had to pull out the "unsalted" butter for the correct recipe, it needs to sit at room temperature! I did so! Later, I went into the kitchen to start the frosting and holy toledo....I pulled the wrong butter. Now, I'm not one to ignore signs! It was a sign that I was too tired and I should not even try to frost the cupcakes. I decided to just go sit down and watch  the first episode of "Downton Abbey" before bed.

So, this morning, I woke up at 4:45am, thinking it was time to get up. I went into the kitchen to start working on the frosting, got everything out, THEN I looked at the clock! OMG....another sign that I've got too much on my mind! Good grief....I'm beat and wound up all at the same time! I decided that I really needed to be fresh for the frosting! So, I went back to bed, woke up at 6:30! Oh fine! I just got up! I did some housecleaning, dishes, laundry....and finally, it was time to start the frosting. So, the recipe I used did not call for any liquid.....weird! I was a bit terrified that I was going to have a big lump of white sugary substance in my mixing bowl....but no, it turned out beautiful, was so smooth and thick, easy to frost with! Here are a couple samples of what I did this morning:


Right now, I'm not trying to master techniques, I am just testing tips to see what they do! The pictures look blue, they aren't....they are a very dark, stunning purple!


I think this is my fave tip, looks like ribbon.....love it!


I really liked this cupcake with the dark purple flowers on top of the white star bursts....it's stunning in person! 


Oh man, I really love this ribbon tip....I am going to learn to master this one especially....it just makes me happy! 

The frosting recipe I used (found on Pinterest): 

Bakery Style Frosting
1/2 cup unsalted butter, room temperature 
1/2 cup shortening
3-1/2 cups sifted confectioners' sugar
1/2 tsp almond extract (I might try Clear Vanilla next time)

Mix butter and shortening on low, until smooth. Add sugar, 1/2 cup at a time, until blended. Add extract, mix to combine. Increase speed to medium-high and beat for 3 minutes, until smooth. 


Tuesday, February 19, 2013

Cleaning as I Go!

So, I have this friend (don't you like how stories start off like that?), who used to make cookies with me. We haven't seen each other in quite awhile...rather, for a VERY long time and yet, we live in the same town. We both have our own lives, I guess! Anyhow, this friend, you know who you are...Tracie, and I were making sugar cookies one day for Christmas. I have THE best sugar cookie recipe (my husband's favorite at least)! I will share later in the post! Sorry, I got side-tracked....anyhow, this friend and I were making cookies in my kitchen. As she was pouring the flour into the mixer, I was wiping up the spilled flour and putting the jar away. After she poured the sugar into the mixer, I wiped down the counter and put the jar away. Same goes for the vanilla, eggs, salt, etc.....Finally, I guess it got to her! She smacked me with a towel and said, "Alright already! Stop cleaning! Clean when we are done, you are driving me nuts"! So, I didn't get it....I didn't realize what I was doing, it's just how I cook and bake, I clean as I go! I hate messes! Anyhow, I was making cupcakes from scratch this weekend and realized, by darn, she was right! It took me longer to make the cupcakes because I was wiping the counter after using each ingredient instead of when I was all done! But hey, if you came knocking on my door whilst I was making cupcakes, I would let you in and not apologize for the mess....well, because there wasn't one! Did I scare her away from playing in the kitchen with me?  I guess I would be what one calls anal! I won't even tell you the story of my Sister's visit and the throw pillows on the couch! Well...I will tell you a little so you won't feel I was holding out on you....imagine pillows with lines sitting horizontally, Sister placing them on the floor and laying down, Me picking them up and laying them horizontally again each time she got up to go say...to the kitchen, to the bathroom! Let's just say....I drove her nuts! Good thing my husband is slight anal as well, he picks the pillows up and places them horizontally as well!

Oh, I need to get back to the Sugar Cookies...I think you might just want the recipe! I don't know where it came from, it's called Ethel's Sugar Cookies but I got the recipe from my Mother in Law, her name is not Ethel and neither was her Mother's name Ethel! Ethel, whoever you are....we love your sugar cookies!

Ethel's Sugar Cookies
Ingredients:
3/4 c Shortening (I use Crisco Butter Flavored)
1 c  Granulated Sugar
2 Eggs (my son asks me to use fake eggs so he can eat the dough, his favorite)
1/2 tsp Vanilla
2-1/2 c Flour
1 tsp Salt
1 tsp Baking Powder

Directions:
Preheat oven to 400 degrees. Mix shortening, sugar, eggs and vanilla in mixer. Stir in baking powder and salt, slowly add flour. Chill as least one hour. Roll out to 1/8 inch thick, cut into desired shapes. Place on ungreased baking sheet, bake until golden for 6 to 8 minutes.

Easy Creamy Sugar Cookie Frosting
Ingredients:
1 c sifted Confectioners Sugar
1/4 tsp Salt
1/2 tsp Vanilla
Water (add 1 tbsp at a time)
Food Coloring (add until desired color is acquired)

Directions: 
Mix all ingredients until desired thickness using whisk. Add food coloring, frost cookies. Let "dry" for several hours. Frosting will be hard on top and creamy on below.

So, ya'll wanna SEE the cookies? Check these out:
Once again....Thanks Ethel for making me the cleaning Sugar Cookie Queen! LOLOL

Sunday, February 17, 2013

I'd Like to Start by Saying.....

Welcome to my Party!

At the encouragement of a friend of mine, Leslie, I have created a blog to capture all my party ideas, party planning, party pictures, party decor, party cards....party anything. At first I was reluctant...I mean, what do I know about planning parties and would anyone really be interested in what I have to say? I do have to say that I've spent many a night, sleepless, because my mind won't shut down, I can't stop thinking about ways to decorate, what to create, how to make the party decor fun, what to cook (I do love planning the food) and how to make the parties exciting. Oh, I don't get into the games, I'll leave that to ya'll! It's silly, but I don't even really like going to parties, again, I will leave that to ya'll! I just like the act of designing, creating, cooking, planning the party.

On this blog, I plan to post pictures of parties I've done, things I've created for parties and recipes....lots and lots of recipes.

It may be slow going as I don't do many parties but I will also show you the steps I've taken to plan for my son's wedding, work birthdays.....testing of cupcake recipes and decorating (by the by, I am new to decorating cakes and cupcakes but I am learning. I will show you my first effort of frosting cupcakes, then I will show you as I progress! I am going to learn how to make Royal Frosting Roses, you will watch me as I learn....yes, it will take a great deal of humility on my part, to show you my failures!

I'm going to start you off with an Angry Bird Card and gift box for Tracy's birthday.....
I will post more pics each day....I just wanted to get the "Party Started"!